Changing the Chamber Door Gasket
Move the chamber door out of the way
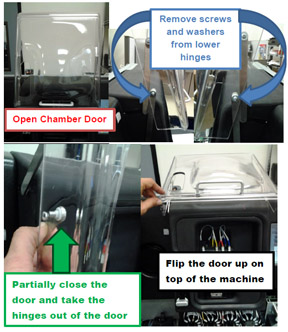
- Open the Chamber door
- Take the screws and washers off of the bottom hinges only (they should be Phillips heads, but may be T15 Torx)
- Partially close the door and take the hinges out of the door
- Flip the door up on top of the machine.

Remove old gasket and clean area
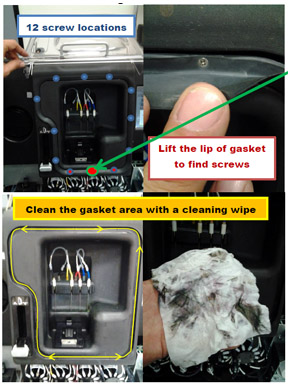
- Take out the bottom 3 screws in the gasket. An extra securing screw point has been added to the fill chamber gasket located at the bottom center
- Loosen the other 9 screws about 2 turns
- Find the screws by lifting the lip of the gasket
- Remove and discard the old gasket
- Clean the area where the gasket touches the chamber with a cleaning wipe to remove any ink that may have accumulated.
- Cleaning the inside of the door is also recommended

Install New Gasket and secure screws properly
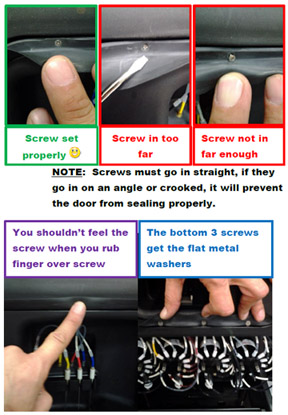
- Put the new gasket in place. Press the gasket over the 9 screws loosened previously. Tighten the 9 screws.
- Be careful to turn the screws down far enough so they cannot be felt when you run your finger over the outside.
- If you can feel the screw from outside the gasket, screw it down a little further. If you go too far the rubber from the gasket can slip out/squeeze out around the screw.
- Install the Bottom 3 screws with washers to help secure the gasket at the bottom of the fill chamber. 3 extra screws are included with the kit in case the originals are lost or missing. 12 screws are all the gasket needs, no more, no less

Reinstall the lower hinges onto the chamber door
- Reinstall lower hinges into door
- Place white washers in place
- Place metal washer over white washer
- Insert and secure screw until snug, do not over tighten
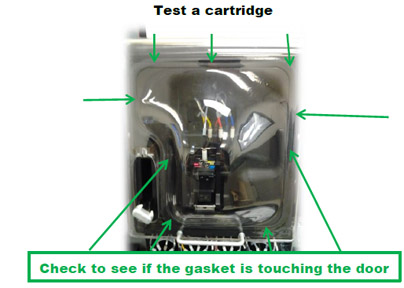
Test a Cartridge
The best way to test how well you replaced the gasket is to refill a cartridge and see if the chamber door seals properly.

DOWNLOAD: Changing the Chamber Door Gasket PDF (Do not try to download the PDF if you are viewing from the InkCenter)