Touch Screen Assembly, CF Card, and Memory Installation
Introduction: This procedure is for the Service Technician. It is not intended for the operator to install.
The following Procedure should be followed when replacing:
- Touch Screen
- Compact Flash Card
- Memory
Call 858-779-9148, Option #3, for Technical Assistance
Please complete the tasks in order!
Preparing for the Part Installation:
- Clear the area on and around the machine
- Log in using your “Tech ID” (741963)
- Press the “Maintenance” Tab
- Select “Machine Shutdown”
- When the screen goes dark, turn off the system power and disconnect the power cord
Remove the Upper Hood
- The upper hood is secured to the machine with seven (7) fasteners
- Using a 3/16" Allen tool or Phillips Screwdriver, remove the seven fasteners securing the upper hood to the machine
- Two fasteners are located on each side of the machine and three fasteners are located across the top of the machine
- Carefully slide the hood back and up to remove
Remove the Touch Screen Assembly
- Remove the touch screen assy. from the system by disconnecting all the cables from the back, then removing one T 20 screw from the right side and lifting up on the touch screen (refer to the Removal and Replacement section of your service manual if necessary)
- Perform required tasks (Change CF Card or Memory)
- Reinstall in reverse order
Touch Screen Assembly – Networking and Adapter ID
Please check the following after installing the new touch screen assembly:
- Power on the system and verify the green network light is lit at the network connection on the rear of the touch screen.
- Verify the machine is connected
- Log in and go to the help tab if there is content, it is “Connected”
- If not connected, connect a usb keyboard and press the F5 key.
- If it still not connected a ping command and possibly a tunnel command will need to be performed
- Test the Internet Connection to the RIS Network
- Next, test to see if the machine can reach the RIS network:
o Type: ping services.retailinkjet.com - The response should look like the previous ping result above. As before, if the ping gets no response or times out, this means that the machine is not able to reach the RIS server.
- To stop the ping, hold CTRL and type C.
- Next, test to see if the machine can reach the RIS network:
- CALL RIS Connectivity Engineer
RIS needs to establish and verify a network connection to the machine. Call RIS tech support: 858-779-9148 opt.3- Some commands that might be necessary for this step include:
ssh –R xxxxx:0.0.0.0:22 –g risuser@services.retailinkjet.com - where ‘xxxxx’ is replaced by a number that RIS will provide. Please do not use this command unless instructed to by a RIS technician.
- Press and hold the ALT, CTRL, and F7 keys to exit the Linux system display and return to InkCenter main screen.
- The RIS technician will then upload and install software and make the necessary identity changes to activate the Ink Center online. The Technician will then call you back to request that you reboot the system. After the reboot, the latest software version number will be displayed on the System tab.
Reboot or power cycle if necessary - Verify the network is connected and communicating before putting the back cover back on! Call RIS service support before leaving the site to verify the system is online.
- Verify all fill adapters have been registered in the fill chamber correctly:
- Navigate to the Maintenance Tab and select “Identify Adapter”
- Place each fill adapter in the fill chamber and select the appropriate ID.
- Be sure to ID each 02 vent cover located in the middle supply drawer.
- Recheck the adapter to make sure the proper ID was selected.
If an adapter is incorrectly identified, remember that you can re-ID the adapter.
- Some commands that might be necessary for this step include:
Compact Flash Card Replacement
- Remove Touch Screen from Ink Center
- Using a T15 driver remove the 8 screws shown
- Lift the cover up, but do not completely remove it
- It is not necessary to remove the power cables
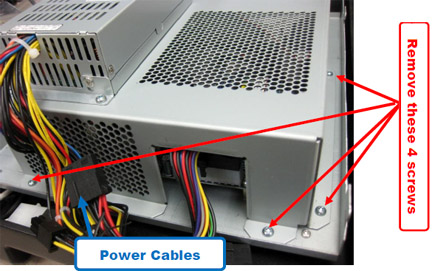
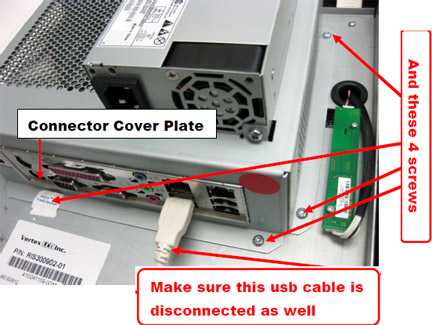
Replace the Compact Flash Card
- Find the location of the compact flash card and gently pull it out noting the orientation
- You may need to wiggle the card to remove it. Note the orientation of the compact flash card
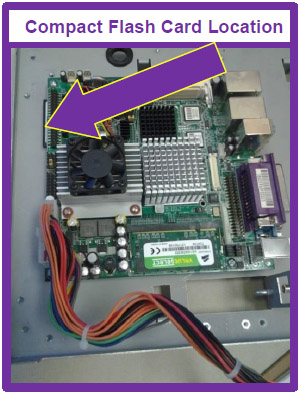
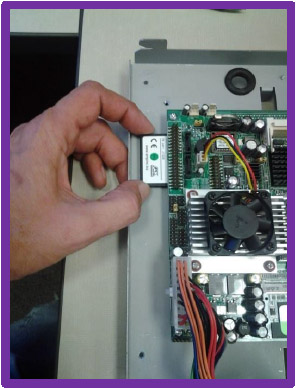
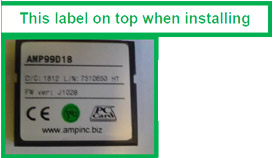
- Place the new compact flash card into the slot
- The manufacturers label on the new compact flash card goes up
- The compact flash card is keyed to help prevent improper insertion
- Gently insert compact flash card until fully seated
NOTE: If you feel any resistance, remove card and ensure it is aligned properly. It should slide in relatively easy.
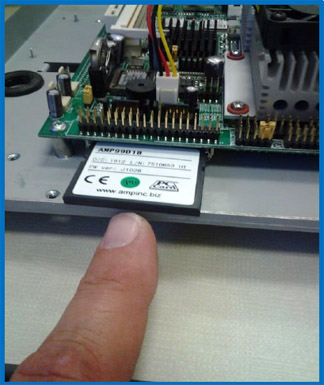
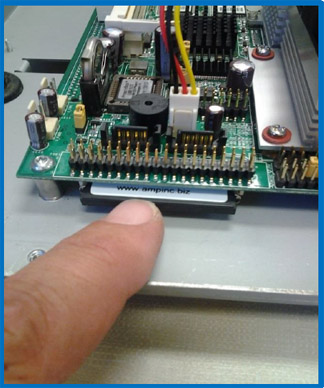
Make sure all the cables are still fully seated as they may have moved while accessing the memory card.
- Put the cover back on, making sure that the connector cover-plate is in place.
- At this point the compact flash card installation is complete.
- Reinstall the touchscreen
- Power up the machine and identify all refill adapters in the fill chamber
- Select maintenance tab
- Select Identify adapter
- Place each adapter in fill chamber and select the correct one on the screen
- Repeat for remaining adapters and HP02 vent covers (located in middle drawer)
- Perform a Total Service Call and process some cartridges.
Memory Card Replacement Procedure
- Remove Touch Screen from Ink Center
- Remove Screws on back of Touch Screen and lift up on cover. Do not unplug power cables
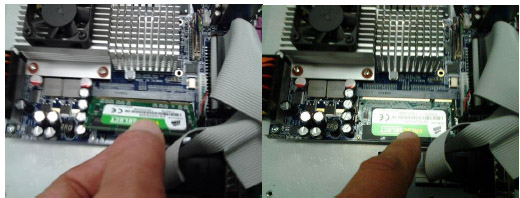
- Find the location of the memory card and press the tabs to release it, and then gently pull it out
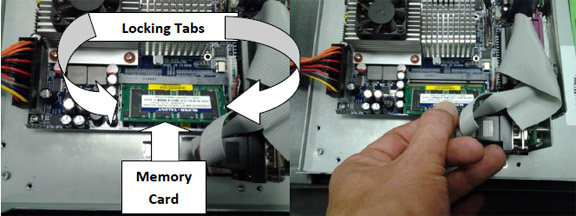
- Place the new memory card into the slot.
a. The label on the new memory card goes up.
b. The memory card is keyed to help prevent improper insertion.
c. Gently insert at a 45 degree angle until it is fully seated, then press downward to lock into place
- Make sure all the cables are still fully seated as they may have moved while accessing the memory card.
- Put the cover back on, making sure that the connector cover-plate is in place.
- At this point the memory card portion of the update is complete.
- Reinstall the touchscreen
- Power up the Ink Center and perform a Total Service Call and process some cartridges. Put the old memory card into the RIS cartridge recycle box.
DOWNLOAD: Touch Screen Assembly CF Card Memory Installation PDF (Do not attempt to download this document from the InkCenter touchscreen)