New Vacuum Wand Replacement
This new wand replaces your current trigger-style vacuum wand, providing reduced air leaks and much greater system reliability. Please replace your existing wand immediately, and return the old wand to RIS using the enclosed return-shipping label.
New Wand Replacement
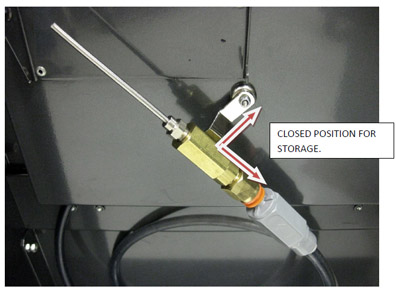
To swap the wands, simply push on the orange rings and pull on the tubing to disconnect the current wand. Next, insert the plastic tubing into the grey filter on the New Wand Assembly until fully seated. Pull on the tubing to make sure it is securely positioned inside the grey filter. Position the new wand in the maintenance drawer as shown in the picture below. Please note the PROPER position of the wand and handle while stored in the machine (See Figure #1). To properly close the handle, it must be at a right angle to the flow of the vacuum. The handle of the wand has a magnet for improved ease of storage.

New Wand Usage
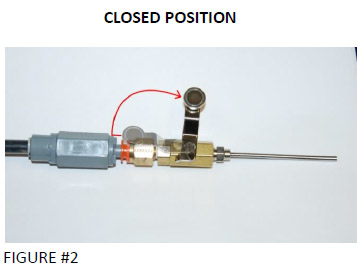
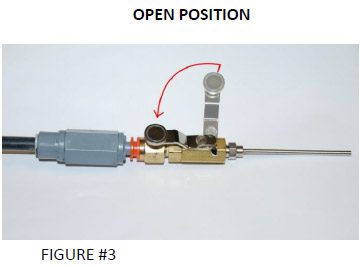
- The new wand has a handle that must be manually rotated to open and close the flow of vacuum through the wand. The Closed Position (Figure#2) and Open Position (Figure #3) of the handle are shown below.
- Activating the vacuum wand is still controlled in the same manner – via the Admin Button on the touch-screen. To use the wand, activate the wand and move the handle to the Open position.
- When done, deactivate the Wand from the touch-screen and return the wand to maintenance drawer. Please note the REQUIRED position of the wand handle when not in use! (Figure #1) THE NEW WAND MUST BE CLOSED MANUALLY – IT DOES NOT CLOSE AUTOMATICALLY!
NOTE: BE SURE TO MANUALLY CLOSE THE NEW WAND WHEN NOT IN USE!
Maintenance Option: Operators can remove and rinse the grey in-line filter if vacuum flow seems reduced.
CLOSED POSITION OPEN POSITION


DOWNLOAD: New Vacuum Wand PDF (Do not attempt to download this document if you are viewing this on the InkCenter touchscreen)